こんにちは、タナカです。
今回は、pytorchを使ってdatasetsを作成する方法を説明します。
- pytorchを使って機械学習をしたい人
- datasetsについて理解したい人
- pytorchを使ってdatasetsを作成したい人
pytorchは機械学習をするためのフレームワークの一つです。フレームワークとは、機械学習をするための道具が入った四次元ポケットみたいなものです。
または、機械学習をするためのライブラリといってもいいでしょう。
pytorchを使えば、畳み込み演算や重みの更新など非常に複雑な計算式を1から自分でコーディングする必要がなく、機械学習を実装することができます。
とは言え、pytorchの使い方を覚える必要があります。
今回は、pytorchの中でもモデルに入力するためのdatasetsの作成方法について説明します。
題材は、mnistの手書き数字とします。
ではいきましょう。
- pytorchでdatasetsを作成する方法がわかる
1. pytorchを準備する
まずはじめにpytorchをインストールする必要があります。
コマンドプロンプトやターミナル、anaconda promptなどで下記のように入力してpytorchをインストールします。
pip install pytorch
2. datasetsとは
datasetsとは一般的に、入力画像(img)と答え(label)が対になったものです。
具体的に言うと、「1」と書かれた画像に対して、「1」というlabelが与えられているものです。
インデックスを指定することで、入力画像と答えの組み合わせをタプルで取得することができます。
今回はクラスを使ってdatasetsを作成する方法を紹介していきます。
3. datasetsを作成する方法
まずはじめに、mnistの手書き数字の画像データを準備しました。
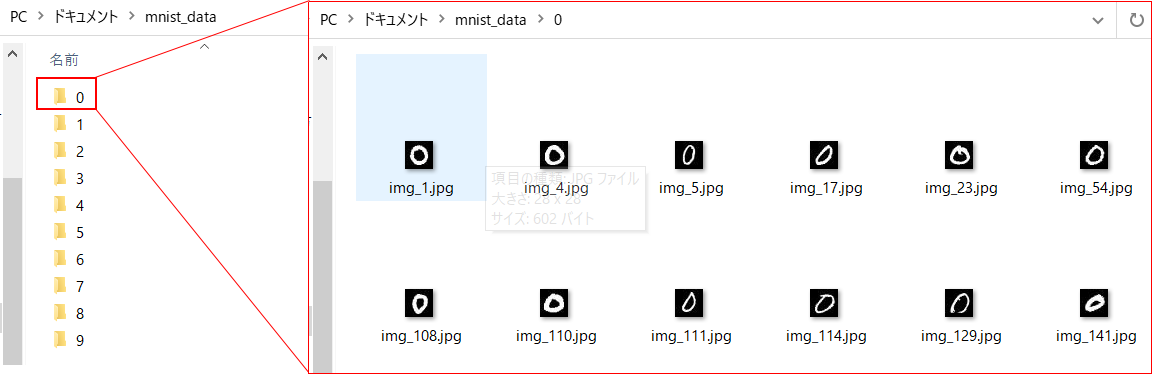
0以外にも1~9までの手書き数字の画像データが保存されています。
datasetsを作成するためには、フォルダ構成を把握しておく必要があります。
この場合は、0~9までの文字がフォルダ名となっており、それぞれのフォルダ名に対応した画像が保存されています。
datasetsを作成するコードはこちらになります。
import torch
from torch.utils.data import Dataset

import os
import random
from PIL import Image

class MyDatasets(Dataset):
    def __init__(self, directory = None, transform = None):

        self.directory = directory
        self.transform = transform
        self.label, self.label_to_index = self.findClasses()
        self.img_path_and_label = self.createImgPathAndLabel()

    def __len__(self):
        return len(self.img_path_and_label)

    def __getitem__(self, index):
        img_path, label = self.img_path_and_label[index]
        img = Image.open(img_path)

        if self.transform:
            img = self.transform(img)

        return img, label

    def findClasses(self):
        classes = [d.name for d in os.scandir(self.directory)]
        classes.sort()
        class_to_index = {class_name: i for i, class_name in enumerate(classes)} # {'0': 0, '1': 1, '2': 2, '3': 3, '4': 4, '5': 5, '6': 6, '7': 7, '8': 8, '9': 9}
        return classes, class_to_index

    def createImgPathAndLabel(self):
        if self.directory:
            img_path_and_labels = []
            directory = os.path.expanduser(self.directory)
            for target_label in sorted(self.label_to_index):
                label_index = self.label_to_index[target_label]
                target_dir = os.path.join(directory, target_label)

                for root, _, file_names in sorted(os.walk(target_dir, followlinks = True)):
                    for file_name in file_names:
                        img_path = os.path.join(root, file_name)
                        img_path_and_label = img_path, target_label
                        img_path_and_labels.append(img_path_and_label)

            random.shuffle(img_path_and_labels)

        return img_path_and_labels
コードの説明をしていきます。
まず今回使用するライブラリをimportしておきます。
import torch
from torch.utils.data import Dataset

import os
import random
from PIL import Image
pytorch以外にもPILという画像処理を行うためのライブラリもimport しておきます。
次にMyDatasetsについて説明します。
class MyDatasets(Dataset):
    def __init__(self, directory = None, transform = None):

        self.directory = directory
        self.transform = transform
        self.label, self.label_to_index = self.findClasses()
        self.img_path_and_label = self.createImgPathAndLabel()
Mydatasetsはコンストラクタとして、directoryとtransformを保持するようにしています。コンストラクタとは、インスタンスが生成された際に実行されるものになります。
transformは前処理をするためのインスタンスですが、今回はdatasetsの作成に焦点をあてたいため、割愛します。transformについては、別の記事で書く予定です。
findClassesとcreateImgPathAndLabel関数については後ほど説明します。
次は、__len__()メソッドと__getitem__()メソッドになります。
    def __len__(self):
        return len(self.img_path_and_label)

    def __getitem__(self, index):
        img_path, label = self.img_path_and_label[index]
        img = Image.open(img_path)

        if self.transform:
            img = self.transform(img)

        return img, label
__len__はdatasetsの大きさを取得するためのものです。下記のようにインスタンスに対してlenを書くことで大きさを取得できます。
datasets = MyDatasets(directory)
print(len(datasets)
>>41954
__getitem__は、datasetsの中で一番重要な部分になります。機械学習をする際に、この部分がfor文などで実行されて、入力画像やlabelとして生成されます。
__getitem__はindexを引数とします。
例えば、0番目の要素を取得したい場合には下記のように書きます。
directory = r'C:\Users\user\Documents\mnist_data'
datasets = MyDatasets(directory)
print(datasets[0])

# >>(<PIL.JpegImagePlugin.JpegImageFile image mode=L size=28x28 at 0x25F09B611F0>, '6')
datasetsというインスタンスを生成し、datasetsの0番目の要素を出力させています。
PILの画像情報とその答えがタプルで出力されていることがわかります。
インデックスを1にしてあげれば、1番目の要素を取得できます。
この画像が本当に「6」と書かれた手書き数字なのか確認しておきます。
import matplotlib.pyplot as plt
img = datasets[0][0]
plt.imshow(img)
plt.show()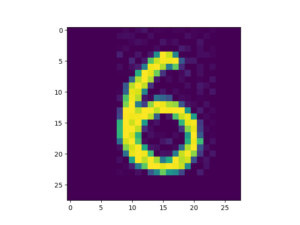
画像と答えがタプルで返ってきているので、0番目の要素を指定することで画像のみを取り出すことができますね。
次にfindClassesという関数について説明します。
    def findClasses(self):
        classes = [d.name for d in os.scandir(self.directory)]
        classes.sort()
        class_to_index = {class_name: i for i, class_name in enumerate(classes)} # {'0': 0, '1': 1, '2': 2, '3': 3, '4': 4, '5': 5, '6': 6, '7': 7, '8': 8, '9': 9}
        return classes, class_to_index
この関数は、directoryの中にあるフォルダの名前に対して、indexを割り当てる関数になります。
言葉だけだと分かりづらいので、3つ例を示すとこのようになります。
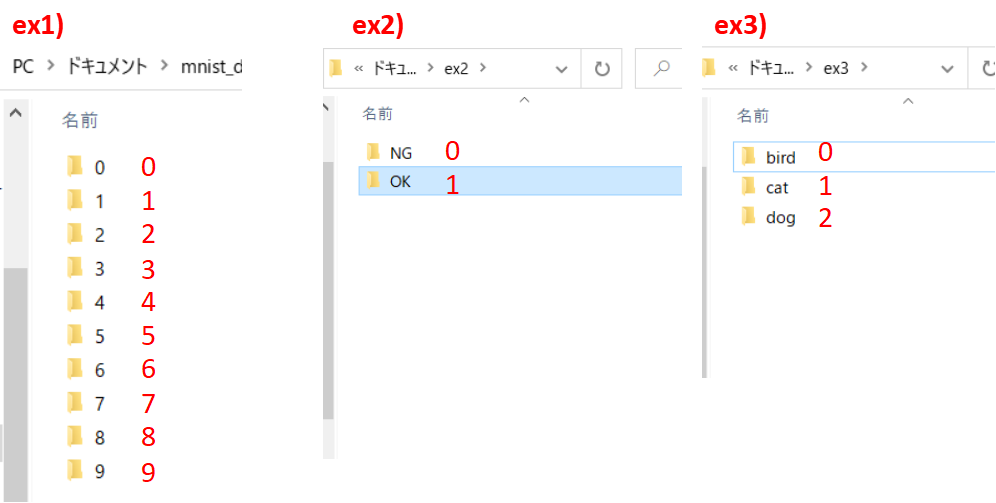
図のようにフォルダに対して0~の数字を対応させています。
これはex2やex3のようにフォルダ名が文字列の場合でも、NGは0というラベルを付けて、OKは1というラベルを付けることで、数字として扱えるようにしています。
最後にcreateImgPathAndLabelという関数について説明します。
    def createImgPathAndLabel(self):
        if self.directory:
            img_path_and_labels = []
            directory = os.path.expanduser(self.directory)
            for target_label in sorted(self.label_to_index):
                label_index = self.label_to_index[target_label]
                target_dir = os.path.join(directory, target_label)

                for root, _, file_names in sorted(os.walk(target_dir, followlinks = True)):
                    for file_name in file_names:
                        img_path = os.path.join(root, file_name)
                        img_path_and_label = img_path, target_label
                        img_path_and_labels.append(img_path_and_label)

            random.shuffle(img_path_and_labels)

        return img_path_and_labels
この関数は、画像の絶対パスと答えを保持したリストを返す関数になります。
0から9までのフォルダ内にある画像のパスを一つひとつ走査して、ファイルのパスとラベルが対になるようにしています。
datasetsの作成については以上になります。
まとめ
pytorchを使って、datasetsを作成する方法を紹介しました。
おそらく、datasetsを作成する方法はご自身のフォルダ構成やcsvなどで多少の調整は必要かなと思いますが、基本的な書き方として参考になれば嬉しいです。